Sunday, April 18, 2010

An Altered Shirt

I was going through my dressers the other day looking for clothes to give to goodwill. One of the primary criteria for such selection is naturally "items I never wear". Now it's not like I never wear t-shirts, but I have an awful lot of t-shirts and I don't wear them particularly often. But I can't just give them away to goodwill since they have strong sentimental value from my college memories.

There is one t-shirt that I wear frequently: a pale blue shirt I picked up at an outdoor market in Ljubljana, Slovenia. It's an unlikely favorite since it's not a color I normally wear, but in a random spurt of creativity back in 2006 I performed a bit of personalization on it that simultaneously made it more comfortable, more chic, and much more interesting.


I attempted that same alteration once more with another shirt I had bought at a gift shop in Bratislava, Slovenia but failed miserably. Either the fabric was different or my methods were flawed and I ended up with a ruined shirt which I eventually just threw away.

But I thought I'd give it another shot in an effort to bring new "life" to an under-used part of my wardrobe. I grabbed a selection of shirts and headed to the fabric store to purchase some extra-wide double fold bias tape to create the edging that had been so attractive on my Ljubljana t-shirt.

I started with just a normal tshirt.


And I cut off the hemline at the bottom, the cuffs on the sleeves, and the collar piece.


Then I sewed the bias tape to the newly cut edges, with the outside of the tape facing the inside of the shirt fabric.


And then I folded the bias tape over the raw edge of the t-shirt and sewed it neatly to the outside of the shirt fabric.


And like every good seamstress should, I made sure to iron it when I was finished.


Voila!


I did three shirts yesterday and two this morning. I expect that they'll all get a lot more wear now that they're much cuter. As regular t-shirts I couldn't escape the feeling that I was dressed like the typical MIT student in the "free t-shirt and old jeans" look whenever I put them on -- if you know what it's like to be a student at MIT (or most engineering schools I suspect) that's practically the school uniform.

I might pull some more shirts out of the dresser to fix them up right, but in the meantime here's the finished roll-call:


One of my favorite East Campus t-shirts, from the "Backstage at EC" rush theme, and the back view:


The show t-shirt from my final show with the Shakespeare Ensemble, "Titus Andronicus" in which I played Tamora, Queen of the Goths.


And the back view. Little known fact: Shakespeare invented "your mom" jokes. Best part: that joke was about me! (or rather, my character)


The t-shirt I (sort of but not really) helped design for First East, the hall I lived on in East Campus for the first 2.5 years of my undergraduate career. It's a design inspired by the disco dance floor the hall collectively made for the Bad Ideas Competition (but unfortunately I was too busy with costume designing a show to help out with).


The t-shirt I had printed for the Shakespeare Ensemble production of "Othello" in which I played the amazing role of Iago during my sophomore year at MIT. Such a stressful and wonderful production. I loved it.


Oh yeah, I look hot.

Monday, April 5, 2010

An Invitation to a Shower

Oh, I had so much fun at Meg's bridal shower last weekend that I'm still reeling in the giddiness it gave me. Therefore this must be a good time to post the lovely (if I do say so myself) work I did on the invitations to the shower.

There are three other bridesmaids but I was quick to volunteer for the task of doing invitations, because I absolutely adooooore all things stationery and lettering. I still write letters to my friends and family -- when I'm not too busy writing them postcards.

I picked up two sets of invitations at a super-discount in some random liquidation sale in Lafayette -- the kind where half the boxes are already opened, some of the merchandise is expired, and all of it looks like it may have fallen off the back of a truck. The two sets were aqua with brown swirly decor and brown ribbons, or classic cream with cream colored ribbons. After much deliberation, I decided upon the aqua and brown. Meg's official wedding color is slate blue, but I doubted anyone would quibble with different colors for the bridal shower.

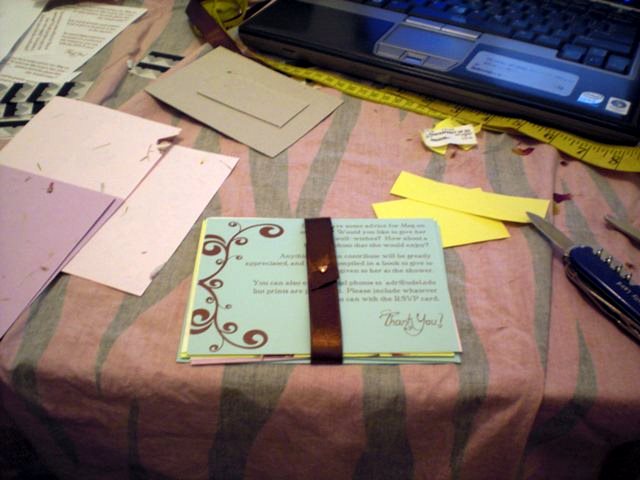
Now I couldn't just use the invitations as instructed. I don't have a picture of what the kit intended one to do (and I can't get a good one now since I'm stuck on the rig) but if you peek into this "example of a messy workspace" photo I took, you might be able to pick out a couple details from the picture on the lid of the box on the left side.


I had to find some way of throwing my own personal touch in them as well. After brainstorming and multiple shopping trips to Hobby Lobby, I came up with a plan. This plan involved a great deal of perusing the Scrapbooking aisles, and learning a lot more than I ever knew about scrapbooking and its accessories. I have never seriously entered the scrapbooking aisle before, which surprises me since I love stationery as I do. Perhaps its the sheer popularity of the art that turns me off. I much prefer the obscure and old-fashioned hobbies one might remember one's grandmother enjoying -- like crocheting lace doilies.

I started with the invitation holder/folder thing. Why do a simple bow with the ribbon meant to wrap around the folder, when I can do something different and more creative? So I found these things called "brads" in lovely "antique metal" finishings. Brads have two metal prongs in the back which you push through a small slot/hole and then fold to keep the brad in place, much like the reusable manila envelope closure ubiquitous in office-land.


So all I had to do was cut a slot through the folder, push the brad into place, and arrange the ribbon accordingly to achieve the lovely result:


The ribbon included was too long for such an undertaking, so I trimmed the extra off, sure that I could find somewhere where I might be able to use it.

While browsing the brads selection, I found another set of brads in the same finishing that were too perfect to pass up. Teeny tiny antique metal heart brads. I knew I'd find a place for them somewhere, and sure enough I did. Meg's sister planned a surprise scrapbook filled with memorable photos and helpful/heartwarming notes written on pretty paper to present to her at the shower from all her guests. I bought some handmade paper with flower petals pressed in the pulp to include in the invitations for such a purpose. Once I had the RSVP card, envelope, the decorative paper and a small instruction card all prepared I took the leftover ribbon, wrapped it around the pile, and used a teeny tiny heart brad to secure the bunch.


Gotta love my personalized Swiss Army knife.


Ah, Charming!

Once I had those assembled, I affixed the invitation itself to the inside of the folder using the double-sided tape provided by the kit, and slid the packet of RSVP supplies into the folder's pouch (which also conveniently hid the brads' tabs).


I used two separate fonts for the invitations: "Maynard" for the body text and "Lapointe's Road" for the decorative parts. I downloaded them for free ... from ... somewhere ...

And eventually I put all the pieces together and mailed them out, with precisely six weeks before the shower and in PLENTY of time to send in the RSVPs and the scrapbook insertions (Sigh. I still haven't written my note for Meg).


And in case you didn't get enough of my messy workspace, here's another photo for you to laugh at how untidy I can be mid-project. My poor housemate had to put up with my monopolization of the 6'x6' dining room table while I completed these pieces, and she is a saint in so many ways I cannot begin to count.


At least I had the foresight to cover our beloved table with an old sheet so as to prevent crafting-induced-damage to the beautiful wood! Perhaps the purple stains from the suit-making extravaganza taught me a lesson which stuck. No, not really. I just love the dining room table that much that I'll go out of my way to be kind to it.

We even used the color scheme from the invitations as a basis for the rest of our decorations. And here is my favorite photo from the entire event.


The shower went off splendidly. I would say "without a hitch" but unfortunately one of the bridesmaids, Meg's younger sister, got a horrible stomach flu the night before the shower and her fun was inevitably spoiled.

Aside from that, we had great fun. Huzzah!

P.S. Special THANKS! goes out to Rebecca who kindly lent me her printer for the project, and even kindlier isn't mad at the fact that I haven't returned it yet.

Tuesday, February 23, 2010

Christmas Snowflakes

I just realized that I forgot to post this project!

Goodness me, how absent-minded. Well, I'm sure that plenty of people across the country have yet to take down their Christmas decorations, so surely this won't be so egregiously untimely as I can simply claim similar intentions.

Growing up with a rather creative mother who crochets, I remember having numerous crocheted lace snowflakes adorning our Christmas tree that we delicately wrapped in tissue (actual facial tissue, haha). They were always part of our ornament stash, so I never wondered where they came from. It wasn't for years that I actually realized my mother had made them herself!

So it was natural for me that during my very first year of learning to crochet lace that I make a few snowflakes that very Christmas. It turned out they make very good gifts!

I just *happened* to have some 30 gauge thread (the thinnest crochet thread readily available) in white lying around from one of my (cough) secret (cough) projects in progress, so I picked out my favorite snowflake pattern and whipped up 3 or 4 in a matter of days.

Before they're blocked they look like funny blobs:


I've been using a sheet of craft foam that I sit on top of my ironing board to block each of my items, but unfortunately it doesn't give very good contrast for the white snowflakes. I played with the contrast settings on this photo, but don't strain your eyes too much trying to see them.


I had some leftover silk ribbon a friend had given me that was extra from a college project of hers. I never knew what I was going to do with it, but it came in quite handy as a bow-tie for the snowflakes! Here you can see the finished product hanging above my fireplace (fireplace not pictured -- just trust me on it).


My output of snowflakes was severely limited by the fact that I left for the rig a good week before Christmas day. Let me know next year if you want a snowflake for Christmas, and I'll be sure to include one in your Christmas card!

Tuesday, February 16, 2010

Engagement Gift

I've been working on a lot of long-term projects lately that are intended to be surprises, so please excuse my lack of recent posts. I can't risk spoiling the element of surprise in the gifts by posting them all over the internet, after all!

But I can't quite excuse how late this post is, since this surprise gift was given back in July.

The gift was for my brother's fiance, Susan, in celebration of their engagement. Here is a picture of the happy couple:


At the time I was working on a crocheted lace project (no more details! That's a reeeallly long term project that is still a surprise). I used some of the thread from that and grabbed a string of beads from a nearby store in Houston on purpose to make a beaded lace necklace from the following pattern I found online.

I used white thread and faux turquoise beads, which were irregularly shaped and gave a much less regimented appearance once all assembled.

I had to think a good long while about how to make it work, and I eventually realized that I had to string all of the beads onto the thread ahead of time in order to successfully crochet them onto the necklace.

The crocheting itself took me around six hours, and I have to say I was quite pleased with the results! Here are some pictures of me modeling the finished product.


Now Susan probably has a much smaller neck than myself, so it won't be so much of a choker on her. I haven't had the luck to see her wear it, but she let me know how much she liked it. As soon as I have a picture of her wearing it, I'll add it to this post, but in the meantime here's a picture she took of it on a statuette she sent to me:


I'm expecting to do more beaded crochet pieces in the future, as this was a very successful first try!

Sunday, September 6, 2009

Ittadakimasu!

Oh man. So I know it's not sewing or knitting or crocheting, but I made something pretty awesome tonight with Sally & Margarita.

SUSHI!

Yum:

Do you recognize the doily? Yep, it's the same one from that second post ever way way long ago (ok, not all that long ago; it was July). The dolls which look disapproving, but actually just have droopy moustaches, are some traditional sort of doll from somewhere in Japan. Sorry I've forgotten the details, but they were given to me 9 years ago and I don't remember anymore. The pertinent point is I didn't make them, but they're fun anyway.

Wednesday, September 2, 2009

Better Late than Never

In the summer of 2007, I offered to make a set of waistcoats for Louis as a graduation present (and because he looks awesome in them!). The original plan was to create a total of 3 of them: a patterned brocade, a silver silk dupioni, and a white satin in the following pattern:


The patterned brocade was completed in good time and sent off with him when he left for California. The silver silk was partially completed, and somehow I stopped when the fabric-covered buttons frustrated me enough (I was also completing my final term at MIT, completing a design project for my thesis adviser, managing a 21-person house, and starring in a play). I wrapped up the uncompleted vest and the white satin wholecloth and put them in a drawer, eventually taking them down to Louisiana with me.

After making such great progress on the suit which I had been planning to make since about the same time, I thought of the waistcoats.

I couldn't believe how far along it already was! The only thing left was the buttons. After examining the buttons, I found that they were all complete but one. I finished the last button, reminded myself how to make buttonholes on my sewing machine, and sewed them on. Voila!


The pockets turned out a little iffy, sigh. I'll just have to do better next time I suppose.

I needed a "vest buckle" for the back of the vest to adjust the strap that tightens it around the waist, which was put on my shopping list for the trip (previously discussed in the posts about the suit) which I was procrastinating on as fast as I could.

So in the meantime, I started on the ties. I thought Louis would prefer the option of having both the necktie and the bow-tie to choose from, and I had plenty of fabric, so I made both.

There was something odd about the pattern I thought, for it wasn't like the last tie I had made (or rather a good 6 of them for my 2.009 team presentation). The bow-tie seemed off as well. It wasn't until I was halfway through that I realized they were both CLIP-ON!!!

UGGGHHHHH!!!! If I had looked at the back of the pattern, I would have seen this:

Oh well. I'd finish them, send them off, and some day go back and make a whole other pair of real necktie and bow-tie. So I reached the point when I couldn't get any further without hardware, realized that every single project I was working on was held up by my procrastinated shopping trip, and FINALLY got off my butt and to the store.

I found the vest buckles. I couldn't find the necessary "slider tie kit" requested for the ties. I was able to improvise by finding a small belt buckle (exactly the right size) and a clever little clip set (slightly too small), and I used a pair of pliers to easily remove the belt buckle's pin to adjust it for the ties.

With all the proper hardware, I was able to finish the vest and the unfortunate ties. Here they are all together:


I adore this fabric. It's so luxurious and beautiful, and I know Louis looks especially good in silver waistcoats, so this should serve him well for all its defects.

Then I found a box to send it in and wrapped it up in a clever little package!


Louis received them, loves them, and will send a photo of him wearing them which I will add for your enjoyment. Yay!

Now I just have to make the last waistcoat in the set of three (and alter that tuxedo so it fits him too... whoops).

Tuesday, September 1, 2009

90th Birthday

My grandmother recently informed me that it would be very welcome if I were to send a birthday card to her brother, my great-uncle, who turns 90 in 5 days.

I decided to to one better, and crochet him a little gift as well! I've seen some freeform crochet pieces on Etsy.com which has gotten me interested in improving my talents in that form.

I thought I would make him a "badge of honor" to celebrate his 90 years, so I took the same red thread I've used for many previous projects to put this together.

Upon creating the base form, I wanted a bit of lacy embellishment. I decided that making loops around the entire number would make it too frilly and difficult to read, so I came up with a clever font that reminds me of a whimsical Microsoft typeface I remember from years ago (but cannot come up with an example to display).

I thought an exclamation point would create a good balance in the overall look, so I ended up with "90!" as the final result. I soaked them in a 1:4 mixture of stiffening solution: water and blocked them out.

I sewed the 9 and the 0 together before blocking them, but the exclamation point i left separated because I wanted the loops to be in their final shape beforehand, thus enabling the positioning to be just right. This turned out to be the right decision.

The 1:4 stiffener:water solution was also a good guess. It gave it enough stiffness to keep it flat, but enough flexibility so that it still felt like fabric. I then decorated a card to attach it to and used a large safety pin to affix it with.

I had briefly considered using an actual brooch backing, but I decided that a large safety pin would be easier for 90-year old fingers to work, since my intention for this piece is to be pinned to a shirt.

And here's an example of it pinned to my shirt!
It looks pretty snazzy if I do say so myself.