Saturday, February 9, 2013

White Coat Ceremony Dress

A White Coat Ceremony is an event put on for new medical students as a sort of "pre-induction" into the medical profession. Speeches are heard, the oath of a student physician is administered, and the short white coats worn by medical students are donned while our families look on and applaud.


During the weeks leading up to the ceremony, the one big question going through my mind was "WHAT AM I GOING TO WEAR UNDERNEATH TO COMPLIMENT MY WHITE COAT?" It was a perfect opportunity to flex my designer's muscles in an effort to achieve the perfect blend of unique, professional, chic, flattering, along with something that screams "ME!"

I was highly pleased with how the dress I made for the first day of school turned out.  Since the pattern I used had many different options, I figured I'd try out another one for this event. For the last dress, I had used a V-neck and 3/4 length sleeves. This time I thought I'd opt for the mock-turtleneck and cap sleeves. (Note to self: try that cowl-neck for the next dress!)


While going through my fabric supply, I found the perfect one. My school's seal has 2 shades of blue as well as a bright yellow in it. I found a cheerful yellow fabric that I just had to use. Funny thing, it had been sitting in a drawer for 10 years! I purchased it while I was living in Japan and made a pair of very cute trousers. I don't know what happened to those (lost in one of the 10 moves I've done since then, likely), but I had the rest of the fabric!

One problem: there looked like there wouldn't be enough. Ugh.


But with a little spatial creativity, I managed to cut all of the pieces out that I needed. The scraps I had remaining attest to just how close I cut it. And I got quite lucky, considering how weird the cross-hatching stripes would look if I didn't have them in the right direction. 


It was a couple weeks before I finished constructing the dress. Med school is not exactly easy, after all. The afternoon before the ceremony, I had the dress built.


But something was missing -- I needed some extra pizazz. So I put the rest of my to-do list on hold, ran across town to Michaels, and grabbed whatever I thought might add a little flair. After a few different options were tried, I ended up with some asymmetrical detailing including a belt, a ribbon on the shoulder, and a few oversized, fabric-covered buttons. The green conveniently matches both the stripes on the fabric, and my lovely green eyes


Here I am on stage, with one of our professors helping me to put on my white coat. 


And here's the reception afterwards, where I am enjoying the celebration with my dear grandmother Shirley, who flew up to Portland just to see me!


And look -- see what I mean about the yellow matching the color on our school seal? It really does tie it together well if I do say so myself. Very well done, Holly, very well done. 

First Day of School Dress

The date: August 1st, 2012. The place: University of New England in Biddeford, Maine. The occasion: My first day of medical school! Here is the view I had arriving on campus. Follow the arrows to orientation...


I made a dress to wear to the first day of school, which was planned out to meet the dress code for our photos. Using more fabric bought on ridiculous discount at the Joanne's going out of business the year previously, I tried out a new pattern that turned out beautifully!

I ended up being too busy to remember to take photos until I got home -- sweaty and exhausted from a long day and a long campus tour in the summer heat (I'm still baffled as to WHY they scheduled the walking tour for the day they specifically required us to wear professional attire and footwear?).

Exhausted, but satisfied!


Class of 2016!


Saturday, January 19, 2013

Moving Day Dress

You know those days when your to-do-list is about 2 miles long and no matter how hard you work you can't seem to check off more than one thing at a time? Well, sometimes when those days roll around I often toss my entire to-do-list out the window and pick up a new sewing project instead!

And thus the "Moving Day Dress" was born.

Back in July I had already been packing for a couple weeks, and I was running out of steam as moving day approached. The day before I hauled all of my stuff up to Maine in a U-Haul I could have cleaned up my room, moved the last few boxes downstairs to be ready for the truck, or done anything to continue getting ready. I could have done any number of things that don't involve sewing. But clearly I HAD to get out my unused fabric and go through all my patterns and pick a gorgeous new ensemble to concoct.


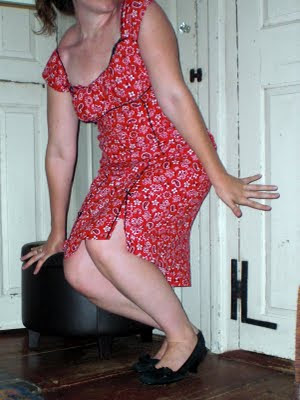
I decided on a striking calico pattern I had grabbed in the last days of my local Joanne's closing sale last year, which I love for summer because it reminds me of Japanese lantern festivals. The pattern I picked was an old out of print pattern I'd bought for a song some untold years ago, and *gasp* have never used! Such a simple, retro style that would clearly flatter me and I haven't once touched it? Shocking.


Within a few short hours I had a gorgeous dress.

But something was missing! It was a great dress that would serve well for many a summer occasion, but it lacked a certain flair. After much brainstorming and perusal of various sources of inspiration online, I decided that my dress needed an oversized, floppy bow.

The first iteration of a proved a resounding failure, and I'm pretty sure I've discarded all photos of that disaster (placement was too high, weight dragged down the silhouette, utterly unflattering). But it gave me one significant eureka moment: the bow must be removable! A waistband and a large snap closure provided the removability, and voila the dress was finished. 

And here I am, showered and exhausted after a long, sweaty day of moving, enjoying my new apartment in my dress made just for the occasion.


Monday, October 15, 2012

Thigh Cookies!


I have a number of projects that I've been meaning to post, but I'm just so excited about what I made this weekend, I can't wait to share it!

The other day I was in Anatomy lab looking at MRI images of the thigh, like this:


The Fellow who teaches my section jokingly described these axial views as "thigh cookies." From this I was inspired.  Using a recipe for Pinwheel cookies often found at Christmas (http://allrecipes.com/recipe/christmas-pinwheel-cookies/) my roommate Hannah joined me and we set to work.

We made 2 red-based shades to make the different muscles, white for the bone, and yellow to make the nerves and skin.


Here's the part where I practice my anatomical knowledge, so feel free to skip ahead to the photos if you don't want to study with me. I started by forming the femur, complete with medial and lateral condyles. I then realized it would work best to build from the bottom up, so I formed the superficial posterior compartment, including the biceps femoris, semitendinosus, and semimembranosus. I then used the yellow dough to form a simplified version of the adductor canal, representing the saphenous nerve, femoral artery and femoral vein. I then placed the adductor muscles, including the adductor magnus which originates from the linea aspera on the femur. I added gracilis on the medial side, and then paused to take a picture.


Then I formed the anterior compartment including the vastus medialis, intermedius, and lateralis, added rectus femoris, which I attached to a patella, and finished it off by forming sartorius. With the remaining yellow dough I added a layer of skin to complete the entire thigh. Huzzah!


You can see the condyles of the femur and the patella sticking out here. Then I popped that sucker in the fridge and went back to studying for a couple of hours.

When sufficiently cooled, I sliced up the thigh and set each cookie out to bake.


It looks pretty close to the real thing, if I do say so myself!


Then Hannah and I packed them up and gave a bunch to the Anatomy Fellows, a bunch to our classmates, and a huge pile to the 2nd year students who are taking their intimidating Neuro final as I type. Good luck, Class of 2015!

Monday, May 14, 2012

This is what I wear when it's really important

Guess what! I got accepted to medical school!!! 

YAY YAY YAY YAY! Come August, I will be joining the ranks of the University of New England College of Osteopathic Medicine's class of 2016. In four short years, I might just change the name of this blog to "Dr. Hollybee Makes Stuff."

But this post is not about that. This post is about a lovely blouse that I just happened to make for my interview to said university. In the last few days before the MCAT I needed something to get my mind away from freaking out too much about the exam, and so I devised and implemented the design for this wonderful addition to my wardrobe. 


Why pale green? Why, to match my eyes of course!

I made a standard button-down slightly fitted blouse, and came up with the idea of adding the pleated detailing to the front in a kind of tuxedo-top style to add a bit of uniqueness to an otherwise normal design. 

Ohhhh my gooooodness --- those pleats took a lot of fabric!!


It took me hours to get those things right, and a number of minor burns on my hands and fingers from the iron (and pokes from the straightpins!). But I got those pleats looking gorgeous. I decided to add a flat edging to them to make them easier to deal with, and flipped one edge over to give a kind of twisted style to them. That way they were even more 3D and amazing. 


Here I am on interview day at the campus! I had just finished all the events for the day when I remembered I needed to snap a photo of myself in all my stylishness. Needless to say that grabbing a picture of myself in high winds by holding my phone backwards while juggling a full purse and a fountain soda was a bit of a challenge. But you can see me, a bit of the blouse, and even a bit of the campus in the background!


Lessons learned: I cut the sleeves a good inch longer than the pattern called for, which didn't even end up being long enough. This pattern requires a good 3 extra inches to be safe (am I that much taller than the average woman? Somehow I doubt it.). This was fixed in this case by adding another set of twisted pleats in between the sleeve and the cuffs. 

Fun fact: while working on the pleats for hours, I caught the movie "No Strings Attached" on Netflix, which just happens to feature Natalie Portman as a nerdy girl from MIT who goes to med school and becomes an awesome doctor! And then she has lots of sex with Ashton Kutcher! Good thing Demi Moore's out of the way, because it looks like I have a great future ahead of me!


Sunday, January 15, 2012

Shoving another sibling down the aisle

Another year, another wedding!


Last October my older sister Ellie married her longtime boyfriend Travis, and I was lucky enough to be maid of honor for their nuptials. As one may likely guess, I enjoyed another chance to get a bit crafty (and thereby spent all my creative energies for last fall, exhausting myself in the process such that I've had little motivation for anything else since then). I have been regretting my laxness in posting lately, so I intend to document the one major project I've worked on over the past six months, which was of course comprised of a million small and large projects.

Ellie of course did the majority of the planning and execution, but I enjoyed my own ideas. So where shall we start? Ellie decided upon candy favors, and picked a cute origami box design to hold them in. I suggested the wrapping, and voilĂ !


I also designed the programs shown above, including sketches done by my mother for decoration. They folded at the top, with the inside text printed on translucent vellum, a series of seashells at the bottom.

Ellie assigned me the task of figuring out the centerpieces, so with the closing sale at our local Joanne's last summer, I put a little something together. An example of which can be seen here:


I found hurricane lamp-shaped vases, which I filled with crushed quahog shells we had harvested from the bay (after eating the meat! yummy!). I grabbed a bunch of nice-looking accessories from Joanne's as well, and together one of the other bridesmaids, Ellie and I decorated about a dozen, each a unique work of crafty art. Then I assigned my cousins to put them on the tables, float tea candles inside and light them. Lovely!

We had planned on the formal photographs being taken at the old front entrance of the house. My mother did a great deal of work on landscaping, making a beautiful backdrop. It's hard to see, but I put together a couple of black and red ribbon arrangements that you can see hanging from the porch and blowing in the breeze. They took a lot more work than they look, so I've been sure to save them in case of the unlikely event I can find another use for them.


My sister had the idea to order a large selection of variegated flowers and arrange the bouquets ourselves, so you can see some more of our handiwork there. It was my mother's idea to include the long, flowing ribbons, and I think they turned out splendidly if I do say so myself!

My absolute crowning glory, however, was my mother's dress. I picked out the pattern and the fabric myself, and my mother never thought it would become her as well as it did. But I knew, so I charged ahead, even when I realized the pattern was undoubtedly the most difficult garment I have ever made.


The. Hardest. Garment. Ever. Well, it was worth it!

Was there anything else? But of course! It may not be considered crafty, but I did get around to doing...

Bridesmaids' hair


And Bridal makeup


Was there anything else? Oh well. After having recounted all of that I'm a bit too exhausted to remember!


Happy weddings!

Monday, July 18, 2011

A Dress Per Day, Day 2

40% off lowest ticket price on all fabrics at Joanne's? Be still my beating heart!

I went a little crazy the other day at Joanne's going-out-of-business sale, and here's the pattern for the first new project I have to show for it.


Purchased at $1.99! Yay sales!

I've never been a big fan of maxidresses, but I just could not resist in this case. I found some gorgeous patterned satin for about $4 a yard, and purchased far more than I needed. I ended up choosing a navy blue georgette to make a contrast for the straps and waistbands, which turned out quite well if I do say so myself.

I plan on going back to Joanne's soon, since it's not fully closing until August 13th and the sales will only get more discounted until then. Plus I forgot to buy various necessaries like zippers and interfacing and have found myself at a point where I cannot proceed much farther without another shopping trip.

In the meantime, there's only one word to describe my progress:


Huzzah!

Sunday, July 17, 2011

A Dress Per Day, Day 1

Here we go...

It wasn't a real project until it turned into one.

You see, I decided I needed more summer dresses. And I was coming up with these gorgeous ideas in my mind until I couldn't think straight in class anymore. So I waited. Until last Thursday, after which I had finished my first exam for Organic Chemistry II, and figured I had the whole weekend to sew to my heart's content.

First day's work: I found this pattern I had tucked away from forever ago:


I usually eschew "New Look" patterns, since they're lower quality than I usually pay for $3 (since I mostly wait until more expensive patterns are on sale for $1-2 before buying them), but there's no guessing what I was thinking at the time I bought this dinosaur.

So, digging deep, I happened to find a single piece of calico cotton fabric that was simultaneously 1). Suitable for a summer dress, 2). Had sufficient yardage to support the pattern, and most importantly, 3). Still matched my style and sensibility. Let's just say that I have a lot of random fabric left over from random projects like ... this one, I guess!

Fact: this fabric is left over from the plethora of extravagant togae I made for my high school's chapter of the Junior Classical League's annual state convention in State College, PA circa 2000. If my memory serves, it was purchased on Fabric Row in Philadelphia, PA, a location of eminent influence in my design development.

The vision of this dress did not fully come into play until it was almost fully realized. Now, behold: the Pin-up girl dress. Sexy, yet demure, red, black, white, and marvelous alllllll over.


You see?


And the detail I added just for fun:


This was finished on Friday, so I used more than one calendar day, and even though I call this "Dress per Day," I always seem to resort to finishing the last little bits for after certin deadlines. Less than 24 hours, though, so I suppose it counts!

In other news: by then a ridiculous thing had happened: I stopped by my local Joanne's Fabrics, only to find out that it was going out of business and had instituted a store-wide clearance sale. I proceeded to purchase more than a year's worth of fabric and spend the rest of the weekend enjoying the fruits of my purchases...

To be continued...


Wednesday, June 29, 2011

Christmas in July

Procrastination, anyone?

Here are some Christmas presents I made this year, that I guess have taken a while to post about. Yeah, that's how I roll.

I decided to do sets of crocheted coasters as gifts last year, with varying color schemes personalized for each recipient. Each coaster would have a solid color base and a crocheted lace doily applique of a unique pattern which were adapted from various snowflakes I found around books and the internet; adapted enough to not look too seasonal. The yarn I purchased was acrylic for the base and cotton for the applique, so entirely machine washable, and heat tested to make sure they had no problems with hot mugs. Then I found little metal tins which would hold each set.

White on beige for my father and stepmother, since it's a classical color scheme she prefers.


White on blue for my aunt and uncle, since blue is her favorite color.


Red on black for my grandparents. I inherited my preference of red from my grandmother, who takes her love to a marvelous degree. These would fit right in with her decor.


A marvelous success! They turned out just as I had hoped.

Tuesday, June 14, 2011

It's Raining Rainbows

Congratulations Boston, on a wonderful Pride 2011! I did my part volunteering in the parade: getting soaked in the rain and hoarse from all the shouting. It was a total blast, and to cap off the end of the festivities, I needed to be sure to have a dress to drool for.

Enter this glorious pattern from Vogue:

V1227

It's soooo 80's. I just can't stand how marvelous it is.

The next step was the fabric. I ended up choosing a striped calico from Joanne's, about as close to a rainbow as a national chain store can get. I suppose I could have considered attempting that craziness that is "matching of obvious stripes" but the fabric was expensive enough -- I wasn't going to go overboard.

Then came the cutting.


And cutting.


And more cutting


You see, Vogue patterns turn out gorgeously. They hang like a dream. They're also really complicated and involve multiple pieces. This particular pattern required 17 individual pieces, most of which required 2 pieces of outer fabric, 2 pieces of liner, and 4! Count them, 4! pieces of interfacing (note: the exclamation point is just for exclamation, not the mathematical operator of factorial)

But I persevered. And then, of course, despite the fact that I confirmed my measurements ahead of time and was careful to use the right seam allowance, the dress didn't fit. Good thing for corset-style, however, it was relatively simple to alter.

And boning! Did I mention the boning? I don't think I've had the patience to put up with boning since 2004. Yikes.

But you know, it does hug the bosoms quite flatteringly


All that hard work turned out spectacularly, if I do say so myself. I wore it to the final night of Pride, and got so many compliments from random strangers to put a smile on my face till same time next year!


Happy Pride, everyone!

Thursday, May 19, 2011

A brand new person to make stuff for!

Congratulations Susan and Eric! My nephew James Kelley Laird was born on Monday, May 9th at 7:14 am, and was 7 lbs 9 oz.


Now I know you must be thinking, "Holly, you must have been working on making baby things for MONTHS by now! There's no way they'll all fit in this blog!!" Well, unfortunately you are incorrect. I've been crazy-busy with studying for finals and rehearsing for the opening of the most amazing musical ever, so I arrived in New Jersey for my first visit with James without a stitch to show for him.

A mistake which was quickly remedied.

Eric had wanted to do a plaster impression of his tiny little baby feet, so we got to work on that.


Now James isn't much of a complainer, but he certainly squirmed a fair amount, and even with his big brother Greg's help, the footprints got a bit smudged.

We poured the plaster of paris over the gel mold of his tiny-winy-wibby-wubby feet (I couldn't resist just one ridiculous baby-talk-extravaganza), and then we waited. And then my materials engineer brother realized that plaster and ceramic are far too similar to enable an easy separation of their interface. Whoops.

So after many, many hours of Eric scouring the edge of the plaster with toothpicks, we were able to extract the mold, and enjoyed the results! Huzzah!


Eric has decided to tell James, when he's old enough to wonder why his left foot looks weird, that he had a club foot and required extensive surgery to look like a normal human being. This strangely enough reminded me of stories my dad would tell me when I asked him probing questions. Clearly Eric is already showing signs of great paternal aptitude.

Then I proceeded to crochet James a monkey hat and a pair of baby boxing gloves. You know, I never really played with dolls when I was a kid. I have decided that this is probably because dolls don't make the incredible squirms and grimacing faces when you wake them up from their nap to play dress-up and do photo shoots.


I love you, James!!!