Sunday, September 6, 2009

Ittadakimasu!

Oh man. So I know it's not sewing or knitting or crocheting, but I made something pretty awesome tonight with Sally & Margarita.

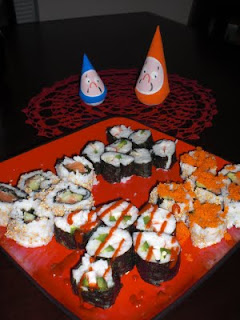
SUSHI!

Yum:

Do you recognize the doily? Yep, it's the same one from that second post ever way way long ago (ok, not all that long ago; it was July). The dolls which look disapproving, but actually just have droopy moustaches, are some traditional sort of doll from somewhere in Japan. Sorry I've forgotten the details, but they were given to me 9 years ago and I don't remember anymore. The pertinent point is I didn't make them, but they're fun anyway.

Wednesday, September 2, 2009

Better Late than Never

In the summer of 2007, I offered to make a set of waistcoats for Louis as a graduation present (and because he looks awesome in them!). The original plan was to create a total of 3 of them: a patterned brocade, a silver silk dupioni, and a white satin in the following pattern:


The patterned brocade was completed in good time and sent off with him when he left for California. The silver silk was partially completed, and somehow I stopped when the fabric-covered buttons frustrated me enough (I was also completing my final term at MIT, completing a design project for my thesis adviser, managing a 21-person house, and starring in a play). I wrapped up the uncompleted vest and the white satin wholecloth and put them in a drawer, eventually taking them down to Louisiana with me.

After making such great progress on the suit which I had been planning to make since about the same time, I thought of the waistcoats.

I couldn't believe how far along it already was! The only thing left was the buttons. After examining the buttons, I found that they were all complete but one. I finished the last button, reminded myself how to make buttonholes on my sewing machine, and sewed them on. Voila!


The pockets turned out a little iffy, sigh. I'll just have to do better next time I suppose.

I needed a "vest buckle" for the back of the vest to adjust the strap that tightens it around the waist, which was put on my shopping list for the trip (previously discussed in the posts about the suit) which I was procrastinating on as fast as I could.

So in the meantime, I started on the ties. I thought Louis would prefer the option of having both the necktie and the bow-tie to choose from, and I had plenty of fabric, so I made both.

There was something odd about the pattern I thought, for it wasn't like the last tie I had made (or rather a good 6 of them for my 2.009 team presentation). The bow-tie seemed off as well. It wasn't until I was halfway through that I realized they were both CLIP-ON!!!

UGGGHHHHH!!!! If I had looked at the back of the pattern, I would have seen this:

Oh well. I'd finish them, send them off, and some day go back and make a whole other pair of real necktie and bow-tie. So I reached the point when I couldn't get any further without hardware, realized that every single project I was working on was held up by my procrastinated shopping trip, and FINALLY got off my butt and to the store.

I found the vest buckles. I couldn't find the necessary "slider tie kit" requested for the ties. I was able to improvise by finding a small belt buckle (exactly the right size) and a clever little clip set (slightly too small), and I used a pair of pliers to easily remove the belt buckle's pin to adjust it for the ties.

With all the proper hardware, I was able to finish the vest and the unfortunate ties. Here they are all together:


I adore this fabric. It's so luxurious and beautiful, and I know Louis looks especially good in silver waistcoats, so this should serve him well for all its defects.

Then I found a box to send it in and wrapped it up in a clever little package!


Louis received them, loves them, and will send a photo of him wearing them which I will add for your enjoyment. Yay!

Now I just have to make the last waistcoat in the set of three (and alter that tuxedo so it fits him too... whoops).

Tuesday, September 1, 2009

90th Birthday

My grandmother recently informed me that it would be very welcome if I were to send a birthday card to her brother, my great-uncle, who turns 90 in 5 days.

I decided to to one better, and crochet him a little gift as well! I've seen some freeform crochet pieces on Etsy.com which has gotten me interested in improving my talents in that form.

I thought I would make him a "badge of honor" to celebrate his 90 years, so I took the same red thread I've used for many previous projects to put this together.

Upon creating the base form, I wanted a bit of lacy embellishment. I decided that making loops around the entire number would make it too frilly and difficult to read, so I came up with a clever font that reminds me of a whimsical Microsoft typeface I remember from years ago (but cannot come up with an example to display).

I thought an exclamation point would create a good balance in the overall look, so I ended up with "90!" as the final result. I soaked them in a 1:4 mixture of stiffening solution: water and blocked them out.

I sewed the 9 and the 0 together before blocking them, but the exclamation point i left separated because I wanted the loops to be in their final shape beforehand, thus enabling the positioning to be just right. This turned out to be the right decision.

The 1:4 stiffener:water solution was also a good guess. It gave it enough stiffness to keep it flat, but enough flexibility so that it still felt like fabric. I then decorated a card to attach it to and used a large safety pin to affix it with.

I had briefly considered using an actual brooch backing, but I decided that a large safety pin would be easier for 90-year old fingers to work, since my intention for this piece is to be pinned to a shirt.

And here's an example of it pinned to my shirt!
It looks pretty snazzy if I do say so myself.

Monday, August 31, 2009

Epic Conclusion

And finally, the stunning conclusion to the epic saga that is the Vogue Suit! I had written a conclusion entry in real-time, but due to a computer error it was lost. I'll just use this as a photo gallery now instead.

Once I finished construction, it took me a number of days to actually complete the suit. I washed it once (in the washing machine! what?) But no bleeding since then. Unfortunately the dye that has already bled onto my sewing machine and hands (and then transferred to light switches, the iron, ironing board, the refrigerator, my bathroom towels) seems to be permanent. Ha. ha. ha.

And the final results!!!

The task that took me the longest to complete was the sewing on of the hooks & eyes. Once I had completed the suit, I discovered that I did not have enough hooks & eyes to complete the entire front closure, and again, I was lazy about getting to the store. Days later I finally I sewed them on, but I might still remove them and sew on snaps instead. The suit is not as tight as a corset, and thus the hooks & eyes easily come undone during normal body movement. This probably would not have been a problem if I had used hook & eye tape as the pattern called for. But! There was no hook & eye tape to be found at the first store I went to, and the second store only had it in white (no thanks!).

Someday I'll replace the hooks & eyes with snaps. I also don't like the fact that you can see them from the front

Sigh. I'll probably get around to that in the next year or so. In the meantime I'll just have to make sure I wear a shirt underneath at all times, unlike how the jacket is shown in the pattern. And for good measure, here's a close-up of the jacket. Soo pretty!

When I was finished constructing the epic-in-and-of-itself jacket, I realized I still needed to finish the pants. Now let's go a little bit farther back on the pants saga...

Back in the Spring of 2007, after pulling an all-nighter on a final presentation for one of my Mech. E classes, I was offered tickets to go see the Scissor Sisters, one of my favorite bands. At the show I fell in LOVE with the pants the lead guitarist was wearing, as you can see here:
The pants in question are on the gentleman on the far right. The ones I actually saw were brown with pink buttons to match that pink shirt, but you get the idea. I wasn't sure if these pants would look any good on me, but when I found the Vogue pattern I showed here, I was determined to give it a shot.

And voila!
Plenty of sass, if I do say so myself. Maybe I should add suspenders and a pink shirt with a tie if I want to really accomplish the look...

Here's another picture just for fun:

Finally.
The End.
And I've still got about 6 yards left of the pink pinstripe fabric for whatever else I might desire :D

Monday, August 24, 2009

Epic Marathon, Pt. 3

The next installment:

7:03am
It's Monday, and I have to finish the suit today and clean up the debris from the nuclear bomb that went off in my house before my roommate returns to town (although I forgot when that was supposed to be). In the wee hours of the morning, I finished one of the sleeves, got a good start on the other, and then took a 3-hr nap. Now it's just finish the second sleeve and finish the lining, then sew on a row of hooks & eyes and I'm done!

11:39am
Well I finished both the jacket and the pants now, except I didn't realize I was short on hooks and eyes. The jacket calls for a row of hooks and eyes to close the front, so I'm going to have to make one more trip to the store... sigh.

To be concluded...

Sunday, August 23, 2009

Epic Marathon, Pt. 2

Continued from the day before, here is the real-time updates for my Epic Sewing Marathon Day 2!!

7:51am
I woke up sore in places too random to understand. Must have been all that crouching and stooping over my scissors. I dreamed I went skydiving. I landed in a muddy field, stole an ancient Winnebago, got stopped at the Canadian border and was given a ticket for not having a license to drive such a vehicle. I'm going to get breakfast started in the rice cooker, put a movie on, and get right back to sewing those dozens of fabric pieces together.

12:24pm
It's starting to look like a blazer! I've got the torso completely put together and the lining halfway finished. Once that's done, I'll be putting the sleeves on and then I'll really have something. Although it's a ton of work, the Vogue pattern is very satisfying to sew. It really feels like a professional piece when I hold it, and not just some fabric thrown together. And for once it actually fits right! (unlike the summer dress debacles) But now it's time to break for lunch, once I wash the purple stains that have been the byproduct of working with this fabric off my hands.

9:55pm
AAAHHHHHHHH!!!!! I got a little more sewing done after lunch, but then I needed a nap. I just ruined my sleep schedule, AND I missed going to blockbuster before it closed. This is going to be a loooonnnng night.

To be continued...

Saturday, August 22, 2009

Epic Marathon, Pt. 1

I am going to embark on a marathon of sewing today, and I will update this post in real-time as the day progresses. So hold on to your hoopskirts cause here we go!

Time: 8:39am
I am hungover and my head is pounding. I put the Pride & Prejudice miniseries dvd on to passively entertain me. I soon realized this was a terrible idea when Mrs. Bennett started shrieking in her strident tones. But rather than turn it off, I have chosen to leave it on as background while I sew! I have no plans today, and I have plenty of sewing that needs doing.

Time: 9:30am
After breakfast and tea, I gathered up my 12 yards of black suiting with pink pinstripes. Ahh, to see a pile of fabric strewn about the room.Yes, 12 yards. Did I mention that it had pink pinstripes? Here, enjoy a close-up:'Nuff said. But oh my goodness! My sewing kit is an absolute mess. Let's make a bigger mess by strewing the contents on the floor and reorganizing.

Time: 9:42am
Ok. Here's the pattern:
I've already made the blouse (through a series of misadventurous sewing, haha. I realized upon it's near completion that I had cut out two identical sleeves, rather than two mirroring sleeves. But I did not have enough fabric to cut out another sleeve! I went back to the fabric store and they were out! I put the blouse away dejectedly hoping that time would solve my dilemma. 6 months later I returned to the fabric store and was lucky enough to find another bolt. I bought the fabric, cut out the correct sleeve, sewed it on, and realized I had sewn the cuff on backwards. Both the cuffs point the same way! Alas, I do not care enough to fix it. I'll just say it has "personality"). But the instructions say that this pattern is unsuitable for obvious patterns or stripes! NOOOOOOOOOO!!!!! Screw it. I've got 12 yards. If these pants don't work, I'll just throw them away and try another pattern.

11:14am
I've tried on the pants and I'm not all that crazy about them. They are obviously more suitable for more waif-like figures, but I'll keep on going. So rather than drive to the fabric store to obtain the correct zipper, I'll just use one I've got lying around (much more suited for jeans, but oh well). If I change my mind about the pants, I'll trade out the zipper later. In other news: the dye is running! Well, not actively running, but I've got dark stains under my fingernails and smudges all over my hands and sewing machine (and a couple on the walls). Hopefully a single wash will solve this problem. Fingers crossed! In the meantime, here's a nice picture of my post-project sewing machine, and the dye which won't seem to wash off:
12:05pm
Pants are nearly done, but I've tried them on with the blouse from the same pattern and I've decided I'm going to keep them. They're saucy. Next task: this jacket. I don't have shoulder pads, so I'll put them on my shopping list along with the proper zipper for my pants. That and fusible interfacing. Ugghhh! I don't want to go to the store!

12:57pm
Oh my god. This pattern is classified as "Advanced". And it's Vogue. That combination means nothing short of epic. The jacket has 16 pattern pieces. I have so far cut out 5, not counting the duplicates required in lining and interfacing. Oh, and did I mention the pinstripes? I've never done pattern matching before. It's going to be a long afternoon...

1:41pm
Pride and Prejudice is over. Time for another one!!!! I'll be putting in the feature film with Keira Knightley now. 12 pieces cut, 4 to go (still not counting lining or interfacing yet, sigh).

2:19pm
After a phone call from Ellie and a declined invitation to lunch, I've finally reached the point where the shopping trip cannot be put off. I do not have enough lining to complete the jacket! But first, a quick shower; I looked in the mirror and saw that my face is smudged with the dye from the fabric! Maybe there's some sort of dye-setting chemical I can buy at the fabric store.

4:02pm
Back from the craft store. It was packed! Busier than a WalMart on Friday night. I finally got hungry so I made myself a quick lunch, and now I just have to cut out the lining and interfacing pieces before I can finally start putting it together. Yay!

4:40pm
Done cutting. Score. Time to sew for real now.

6:22pm
Ahhh! A friend just called to confirm plans I had made to go see a play tonight. What? Sigh. I suppose I should be at least a little social. Gotta get dressed!

10:38pm
Back from the play; it was a cute one called "If it Ain't One Thing, it's Another" by a local Louisiana playwright. I'm too tired to sew anymore, and I'm too decisive to eat anything, so I think I'm just going to have to brush my teeth and call it a day. With any luck I should be able to get a full night's sleep tonight (I slept three hours night before last, nine hours yesterday afternoon, and three more hours before getting going this morning). And hey, if I can't sleep, I'll just get up and do some more sewing!!

To be continued.
Wednesday, July 29, 2009

Summer Dress, Take 2

Last summer I bought patterns and fabric for 3 separate summer dresses. I had gotten the feeling that my wardrobe was lacking in that area, and living in Louisiana as I do (I live south of I-10; that means I'm truly Southern, right?), adequate summer clothing is a necessity.

However, I didn't make the sort of fast progress on them that I had hoped. In fact, I ran into such roadblocks that I almost gave up entirely! I began my first dress, a spaghetti-strapped number with a gathered bodice and a flared knee-length skirt in beige, only to find that it was WAY too big for me! The bodice made any alterations seem rather daunting, and the poor unfinished piece sits folded in my closet for the day I gain 75 pounds (May that day never, NEVER come).

I began the next dress more optimistically. It is a halter-topped dress with, again, a flared knee-length skirt. The pattern is pictured below:


The fabric is a blue calico with an off-white flowery swirly pattern. The off-white swirls have a gradient of sorts, and in places turn darker to a pale-ish goldenrod. This is probably difficult to see in photos, but I am constantly looking down at my dress thinking I spilled something on it, only to realize it's actually part of the dye scheme. Ha.

Here is the partially finished version of the dress:


Unfortunately this dress also turned out RIDICULOUSLY too large for me, but fortunately the pattern lent itself better to easy alterations. 6 inches of tucks later, it fit reasonably well!

Now I always like to throw in a little personalization on each piece of clothing that I make, since I consider myself as more of a designer than a seamstress, and of course I NEED to express the uniqueness of HollyBEE in all of my creations. When I purchased the materials for this dress, I also purchased 3 yards of 4" wide satin ribbon in cream to sew above the hem of the dress. The ribbon is wired and edged with faux seed pearls, and looked like a perfect complement to the fabric's palette:


But when it came down to it, I really didn't like the final look of the ribbon over the hem (which looks a lot whiter due to the camera flash). And when I looked at myself in the mirror, I really knew where it needed to go.

The bodice of the dress looked much more well-defined in the pattern illustrations above, due to the benefits of watercolor shading, and my own semi-final product seemed rather lacking.

So I took the ribbon, rearranged it a bit, and in the end decided to use it in a flattering pattern around the bodice area of the dress to give it the something that was missing.


After removing the pieces of wire from the beaded edging that were poking into me, it turned out just the way I wanted it to! I was so pleased with it, I wore it to my dear friends' Anisa & Snowflake's wedding last week for its debut. This was an interesting opposite-coincidence, as the one time I decide to wear blue, the entire wedding party was decked out in red. There was one square dance in particular, where I happened to be surrounded by 5 members of the wedding party and another couple wearing outfits in the "red family" and I stuck out like a sore thumb for my blue dress. I must have done that on purpose by accident I swear!

Here is a photo I was able to wheedle out of the exhausted bride and groom at the end of the reception.


I would also like to thank the lovely Anisa for essentially being the inspiration for me to start this blog. She has a wonderful blog of all of her knitting projects, and is probably the most talented knitter I have ever met (grandmothers excluded, naturally). In fact, one of the only reasons I felt adequate enough to start a blog much like she has is because I do not knit and thus I feel like comparing our talents is as comparing apples to kumquats.

So thank you, Anisa, and MANY CONGRATULATIONS!
Love,
Holly

P.s. Congratulations as well to Snowflake, who although does not knit, is a great aficionado and also a great friend of mine. I am sooo happy for you both!

Saturday, July 18, 2009

In The Beginning

My first attempt at lace crochet was a "Scalloped Edge" lace that I found in a book called The Complete Guide to Thread Crochet by Rita Weiss. The book is very useful for me, since it's pictorial diagrams of all the different types of stitches are easy to understand at 3 o'clock in the morning when I'm half-catatonic from the lack of sleep due to coming off of night shift on the rig, and I can't for the life of me remember how to do a slipknot.

Unfortunately, the instructions they give for various projects seem to be riddled with mistakes and typos. I sat with my mom for hours back in March trying to decipher what they were telling me to do. This was only possible if my mother read the instructions, tried to work through the mistakes in their directives, and then perform the crocheting herself. I would watch what she did and make occasionally successful attempts to replicate it myself.

But my vacation ended and I went home to Louisiana, where I no longer had my mother to show me what to do. Perhaps this would have been a good time to get a webcam?

I was sent offshore in April (which you can read about here), and although I brought my crocheting with me and occasionally took it out of its bag, I made not a single stitch in the weeks I was there. After a long stretch on the rig, I came home and decided I wasn't going to do anything work-related for a week. So because I wasn't forced to be awake during the day, I had no impetus to switch off my night-shiftedness, and through mere inertia I remained a night-owl for nearly a week and a half. I quickly realized that the Scalloped Edging was a lost cause, for there was no way I was going to be able to continue it on my own.

And thus began a crocheting marathon, and the project which I cut my teeth on. I spent the ensuing nights on the "Simplicity Doily"; perhaps a misguided idea since it also came from the same book notorious for the poor instructions. The doily is shown in the bottom left picture on the cover.


The nights continued slowly, as I would struggle through row after row of the project, occasionally trying to guess what the author actually meant to say, and often completely bewildered at what I was actually supposed to accomplish. In comes Mom to the rescue again! I would work until I was completely stuck, and then wait for 5am Eastern Standard Time (4am for me in Louisiana), at which point I would call up my mother and explain my dilemma. After describing the dilemma, we would have a long discussion about what the instructions said, what I thought they meant, and what the picture looked like, and eventually I would have a reasonable approximation of what I was supposed to do. The rest of the early morning hours would continue like that, with my mother receiving about 2-3 calls daily. I would go to bed sometime around 12pm, sleep till evening, and make one more quick phone call before my mom went to bed and I continued on my project.

The employees at blockbuster started to recognize my car as it pulled up when I would make daily visits to rent the next season of Desperate Housewives, or whatever other TV series was providing background entertainment for my crocheting that night. Eventually, I finished!! I actually completed a crocheting project!
It only took me another month or so to go out and buy the stainless steel pins I needed to block it. Here is what it looked like while blocked:


Unfortunately the foam piece that I bought to provide the base for blocking was too thin for the fully stretched-out doily, and I sort of fudged the edges. I'll probably re-block it again one of these days (which probably translates to roughly a year from now). I used a stiffening solution at half-concentration, mostly as a test of the solution itself. And here is the final result of the doily, adorning my dining room table.

I might still revisit the abandoned Scalloped Edging now that I have gained sufficient proficiency in lace-making such that my mother rarely gets the early-morning calls from me anymore. It looked lovely in the picture and would make a perfect edging for a handkerchief.

Saturday, June 27, 2009

Hotel Room Crocheting

I'm slightly stranded in a hotel room in Cameron, TX (a good 2 hours from any real civilization), and I decided to pass the time by working on some of my lace crocheting practice.

I've got this big ball of red 10 gauge cotton crochet thread and a size 6 (1.80mm) hook. I've been carting these around to the oil rigs I've been sent to lately, and this is actually the first time I've pulled it out on one of my trips.

I picked out a pattern of lace from 50 Beautiful Edgings by Terry Kimbrough. The pattern in the book is shown below.


Now this pattern is great because instead of having to pick out the entire length ahead of time, you build it horizontally. So after about eight inches of lace, I decided to turn what was just going to be a sample piece into a functional headband. I have a frustratingly large head, preventing me from finding well fitting glasses, hats, and also headbands. Most headbands I buy end up being too tight and slipping off my head, so I've always wanted to make my own large-headed headbands.

I measured the area around my head where the headband would go and subtracted two inches to make it a good fit, and even that made it quite loose, but the proof will be in how well it stays on over the course of an entire day. (Another option would be to just bobby-pin it into place, but I'll try that later. I didn't bring any bobby pins to the rig).

And here is the final result:


A close up of the detail:


shows how I may have made a mistake or two along the length of lace. This was a very easy pattern, so I quickly abandoned reading the pattern to watch "Green Wing" (a terribly amusing British hospital comedy) and occasionally did a 5-chain instead of 2-chain. I'm not too concerned, since this was only planned as a sample originally.

I attached the two ends with slip-stitches, creating the headband. It has a bit of a seam, but all store-bought headbands I've ever owned had one as well, and I just turn it on the inside at the nape of my neck.

The lace hasn't been blocked or starched, but then I'm still semi-stranded in my hotel room in Texas, so I consider it quite a success! Huzzah!